Support / Quick Start Guides / Belly Pack Lite Remote Quick Start Guide
Belly Pack Lite Quick Start Guide
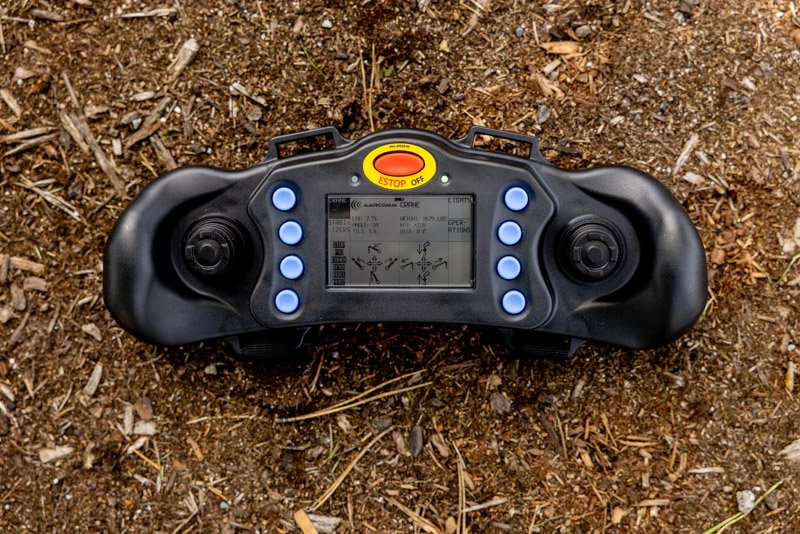
Aarcomm’s Belly Pack Lite Quick Start Guide provides support for the following items included in your Belly Pack Lite wireless remote control system:
Belly Pack Lite
C220/C200 receiver
Antenna
Charging cradle
Wiring harness
Quick links:
Powering on the Belly Pack Lite
NOTE: If you have a brand new Belly Pack Lite, and the screen is blank, you will need to place it on the Universal Charging Cradle or plug in the BPT Lite to the appropriate charger.
The Belly Pack Lite unit requires a special sequence to power on. This sequence verifies that the start and stop buttons are working correctly prior to operation. It also minimizes any accidental powering-on of the unit.
To power on the Belly Pack Lite:
Press and hold the red Estop button
Press and hold the top left button labelled ‘Start’
Release the red Estop button
Release the top left button.
The Belly Pack Lite will now display a start-up screen.
> Regular flashing GREEN light: Unit turned on but no radio link to receiver.
> Solid, or quickly flashing GREEN light: Unit is turned on and linked to a matched receiver.
Powering off the Belly Pack Lite
Pressing the RED E-STOP/OFF button will shut down the Belly Pack Lite unit. The display in the Belly Pack Lite will be put into sleep mode and will not draw power from the battery, even though there are images being displayed.
Matching Instructions
To put the Belly Pack Lite unit into matching mode:
Turn off the remote control
Press and hold red Estop button
Press and hold three lower left round buttons at the same time (not the “Start” button). The GREEN light will turn on and the RED light will begin to flash more quickly.
Release all lower left round buttons. The screen will display “Match Mode” followed by firmware information.
Release the red Estop button
To put the receiver into matching mode, there are two methods:
First Method
Apply power to the Receiver.
Momentarily “blip” the power off to the Receiver six to seven times (i.e. power off
for 1/2 second, power on for one second; six times). Leave the power on after the sixth blip.
The Receiver light will turn DEEP BLUE. Once matching is complete, the light will change to an intense BLUISH-WHITE colour.
Second Method
Apply power to the Receiver.
There are four magnets on the bottom of the Belly Pack Lite unit, arranged in two pairs. One pair of magnets has a CAN symbol between them, while the other pair has a USB symbol between them.
To trigger matching mode in the Receiver, the magnets of only one of the pairs must be waved over the Aarcomm symbol on the face of the Receiver. (Using one magnet from each pair may not work.)
If the Receiver successfully detects the magnets of the Belly Pack Lite, the Receiver light will turn DEEP BLUE.
Once matching is complete, the light will change to an intense BLUISH-WHITE colour
Receiver (C220/C200) Mounting
The C220/C200 is waterproof and IP67 rated. Recommended mounting location should still be protected from weather and vibration.
The C220/C200 comes with a wire harness that is specific to your machine. Fully insert the connector into the bottom of the C220/C200 and tighten the hex screw. Do not over tighten.
Charging the Belly Pack Lite
The Belly Pack Lite is waterproof and completely sealed to IP67 rating. For improved reliability, it does not have a removable battery and is charged using the Universal Charging Cradle. The four magnets on the back of the Belly Pack Lite are only used for alignment and not for electrical contact.
During operation, the RED light will begin to flash when the Belly Pack Lite should be charged. Place the Belly Pack Lite on the Universal Charging Cradle to begin charging. The display will show the charge status; please allow a minute or two for the charge level to be calculated accurately.
A battery that is completely discharged will take approximately three hours to charge. The battery can be charged at any time even if it is not depleted. A quick 30-minute charge will allow the Belly Pack Lite to operate for eight hours. A full battery will last 40 or more hours, depending on the performance setting.

